
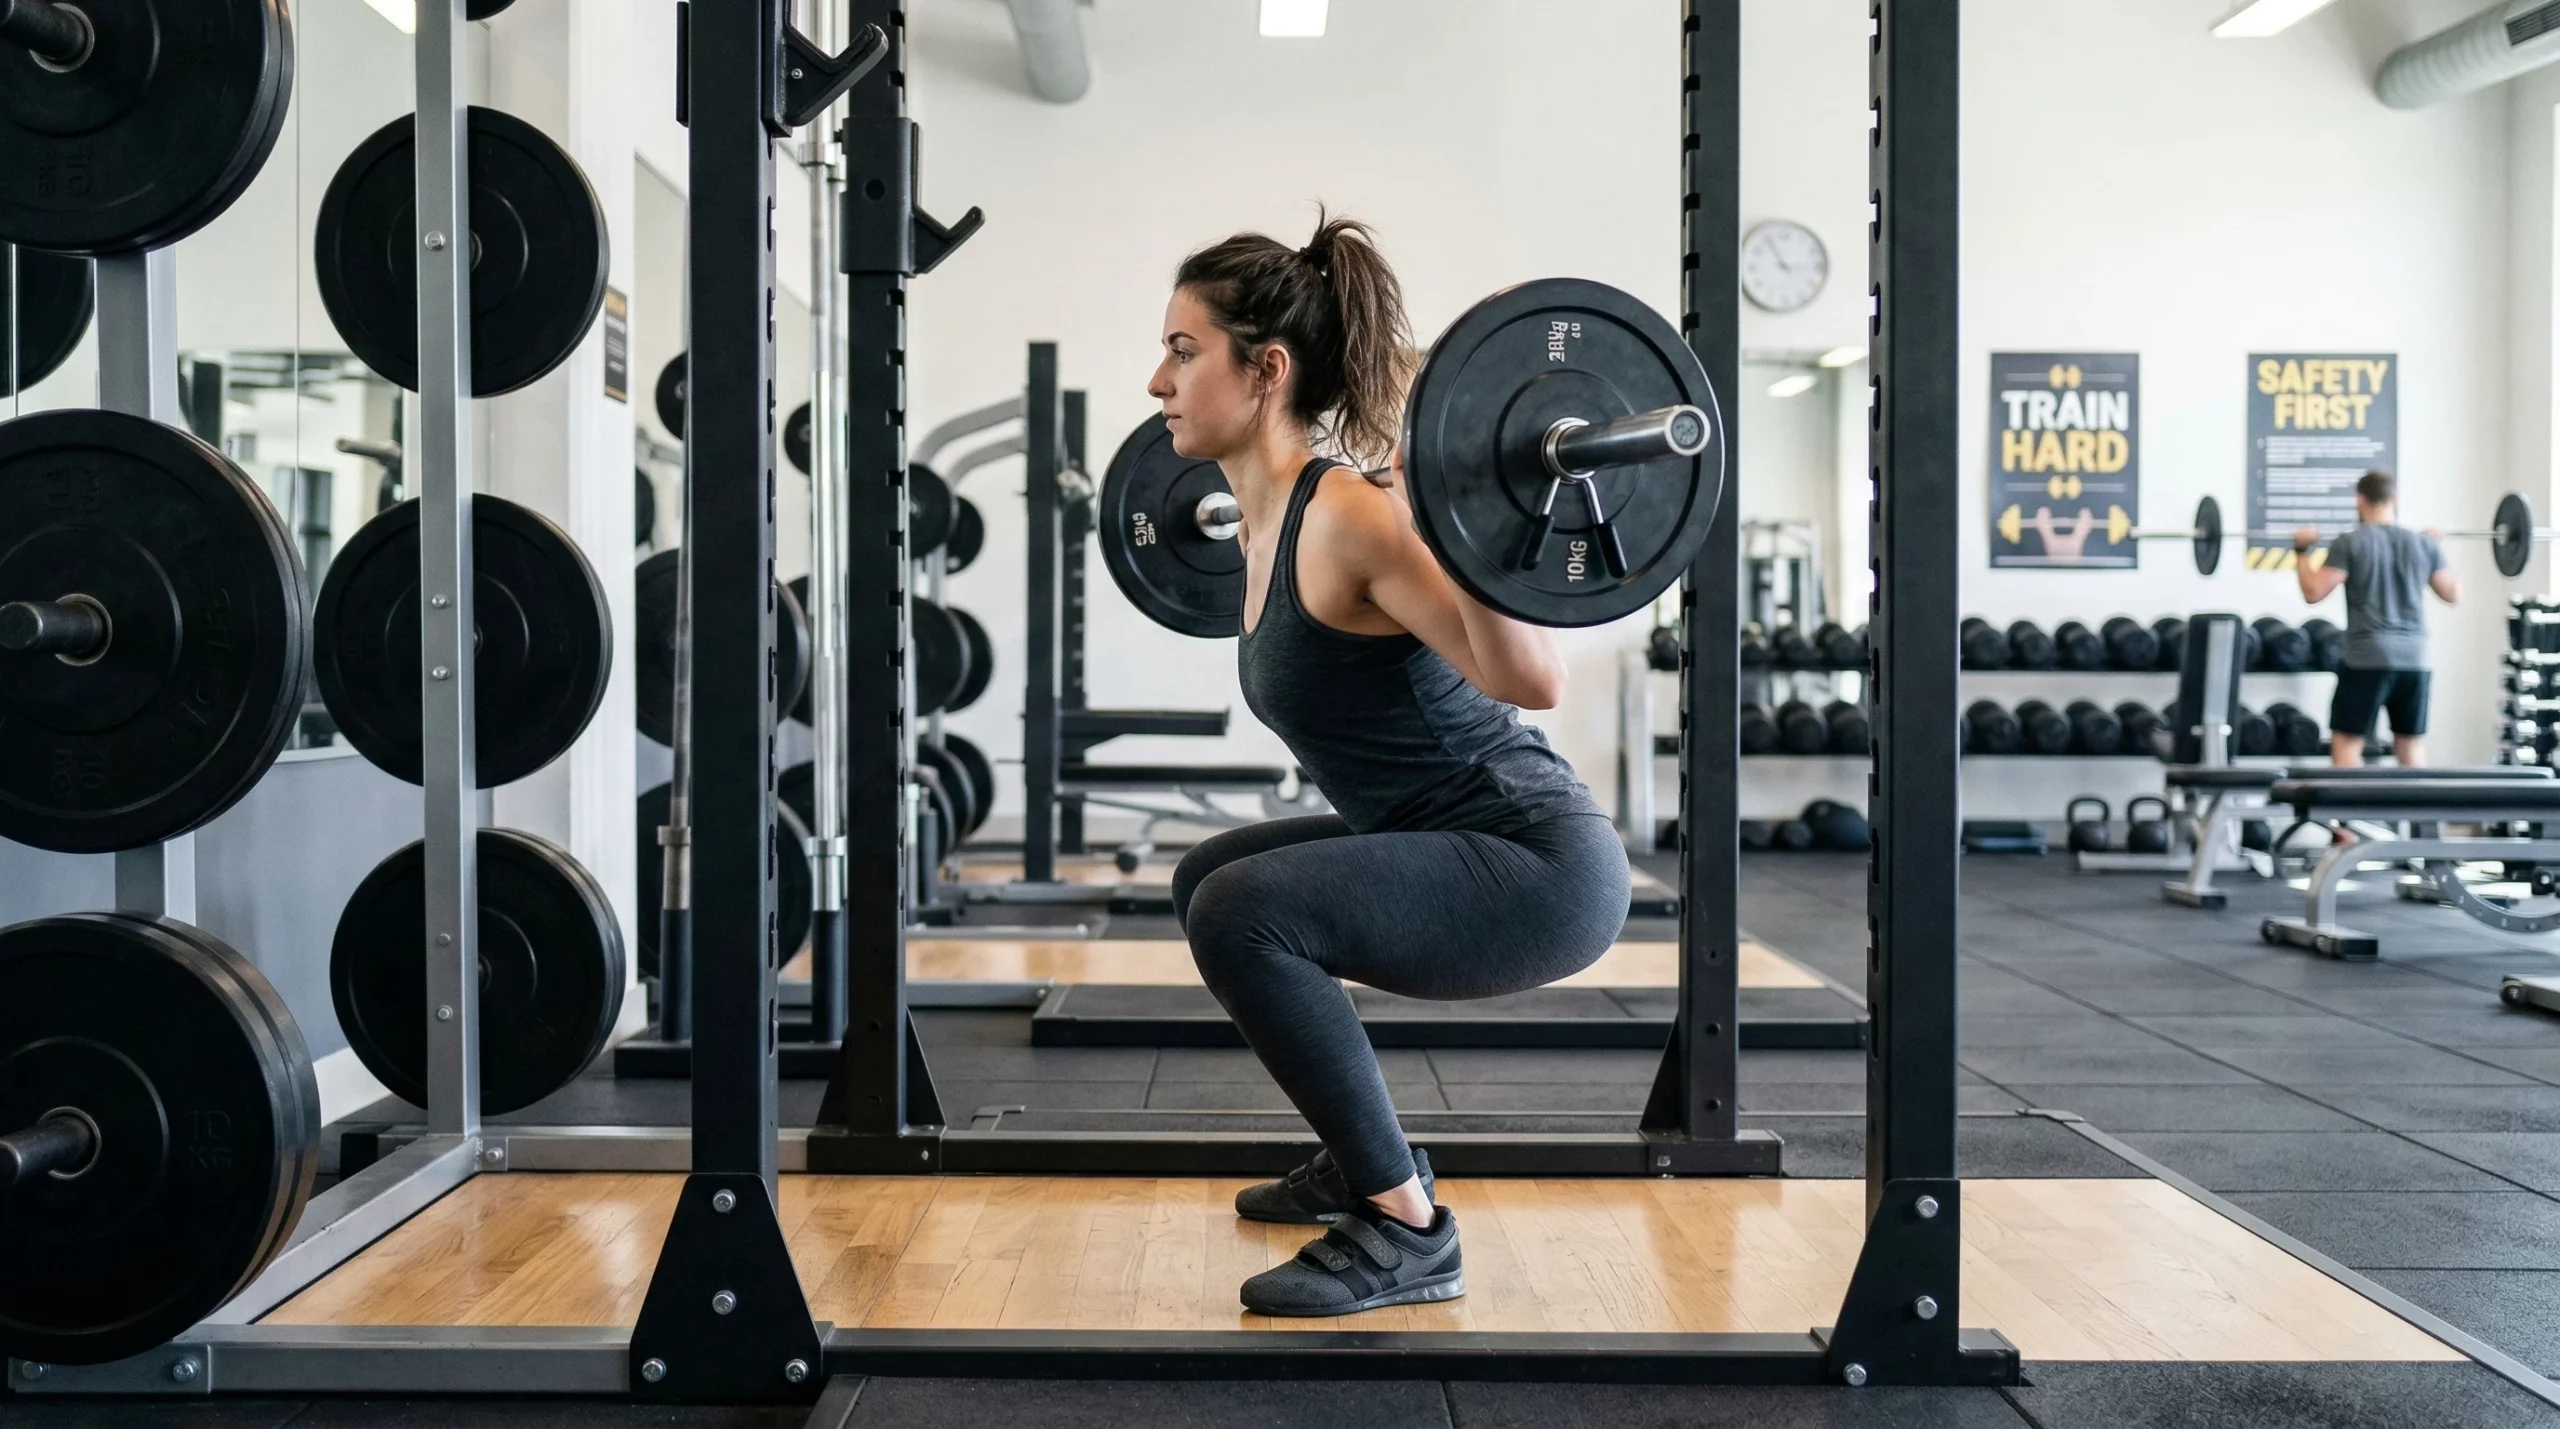

Barbell squats are one of the most effective compound strength exercises out there. They don’t just work your legs; they also challenge your entire body and boost strength, mobility, and confidence. For those starting out or returning to strength training, learning to squat safely with a barbell brings real long-term benefits and a noticeable boost to overall athletic ability. If you’re coming back after time off, this guide on Beginner Fitness Plans After A Break explains how to ease back in with lighter weights, fewer sets, and safer progression. This step-by-step barbell squat tutorial explains exactly how beginners can perform the exercise safely, confidently, and with proper technique from the very first rep.
Squats have a place as a foundational movement in nearly every training routine, including a 4 day workout routine for beginners built around a simple upper/lower split. If you’re building a complete routine around this movement, start with a structured Beginner Bodybuilding Workout Plan (12-Week Foundation Blueprint) that shows how squats fit into a full program. They help build the muscles that support daily life, sports, and total body health. This guide will walk you step by step, so you can squat safely and lock in good technique from your very first rep.
This detailed, beginner-friendly tutorial breaks down what to expect, how to set up your equipment, perform the lift, and avoid common mistakes. Whether you’ve never squatted before or it’s been a while, the clear instructions and tips here will help you train smart and skip the hassle or injury.
If you’re new to squatting, it’s completely normal for the movement to feel awkward at first. Most beginners need a few sessions to get comfortable with balance, depth, and coordination before everything starts to feel natural.
Muscle growth for beginners depends on three key factors: structured training, proper nutrition, and consistent recovery.
Quick Answer
A proper barbell squat involves placing the bar on your upper back, bracing your core, lowering your hips until your thighs reach at least parallel, and standing back up with control. Beginners should start with light weight, focus on good form, and gradually increase load over time.
Table of Contents
- Quick Answer
- What Is the Barbell Squat and Why Do It?
- Muscles Worked in the Barbell Squat
- Safety Considerations for Beginners and Returners
- Equipment Needed for the Barbell Squat
- Proper Bar Placement: High Bar vs Low Bar Squats
- Step-by-Step Squat Setup
- Step-by-Step Squat Execution
- Breathing and Bracing for Beginners
- Tempo and Movement Control
- Squat Depth: How Low Should You Go?
- Common Beginner Mistakes (and How to Fix Them)
- How to Pick a Starting Weight and Progress
- Keys to Safe and Effective Squatting
- How to Practice Squat Technique Before Using a Barbell
- Squat Alternatives for Beginners
- Technique Checklist Summary
- Common Beginner Questions
- Key Takeaways
- Final Thoughts
- Beginner Bodybuilding Guides on Lift & Nurture
- References
- Want a Complete Beginner Plan?
- About the Author
What Is the Barbell Squat and Why Do It?
The barbell squat is a lower body strength exercise where you rest a weighted bar across your upper back and bend your hips and knees to lower your body before standing up tall. This movement is known as a compound lift since it works several muscles and joints at once. You’ll find it in gyms, athletic programs, and even physical therapy settings for good reason.
Squats are considered foundational because they help you:
- Build leg, hip, and core strength crucial for many daily activities
- Maintain strong and healthy bones
- Improve balance, body control, and overall stability
- Support smooth movement and mobility as you age
- Develop better posture and athletic performance
You can adjust barbell squats to match your fitness level, flexibility, or equipment. If you’re just getting started, focusing on controlled squat technique creates the base for safely adding more weight later, if and when you want.
Muscles Worked in the Barbell Squat
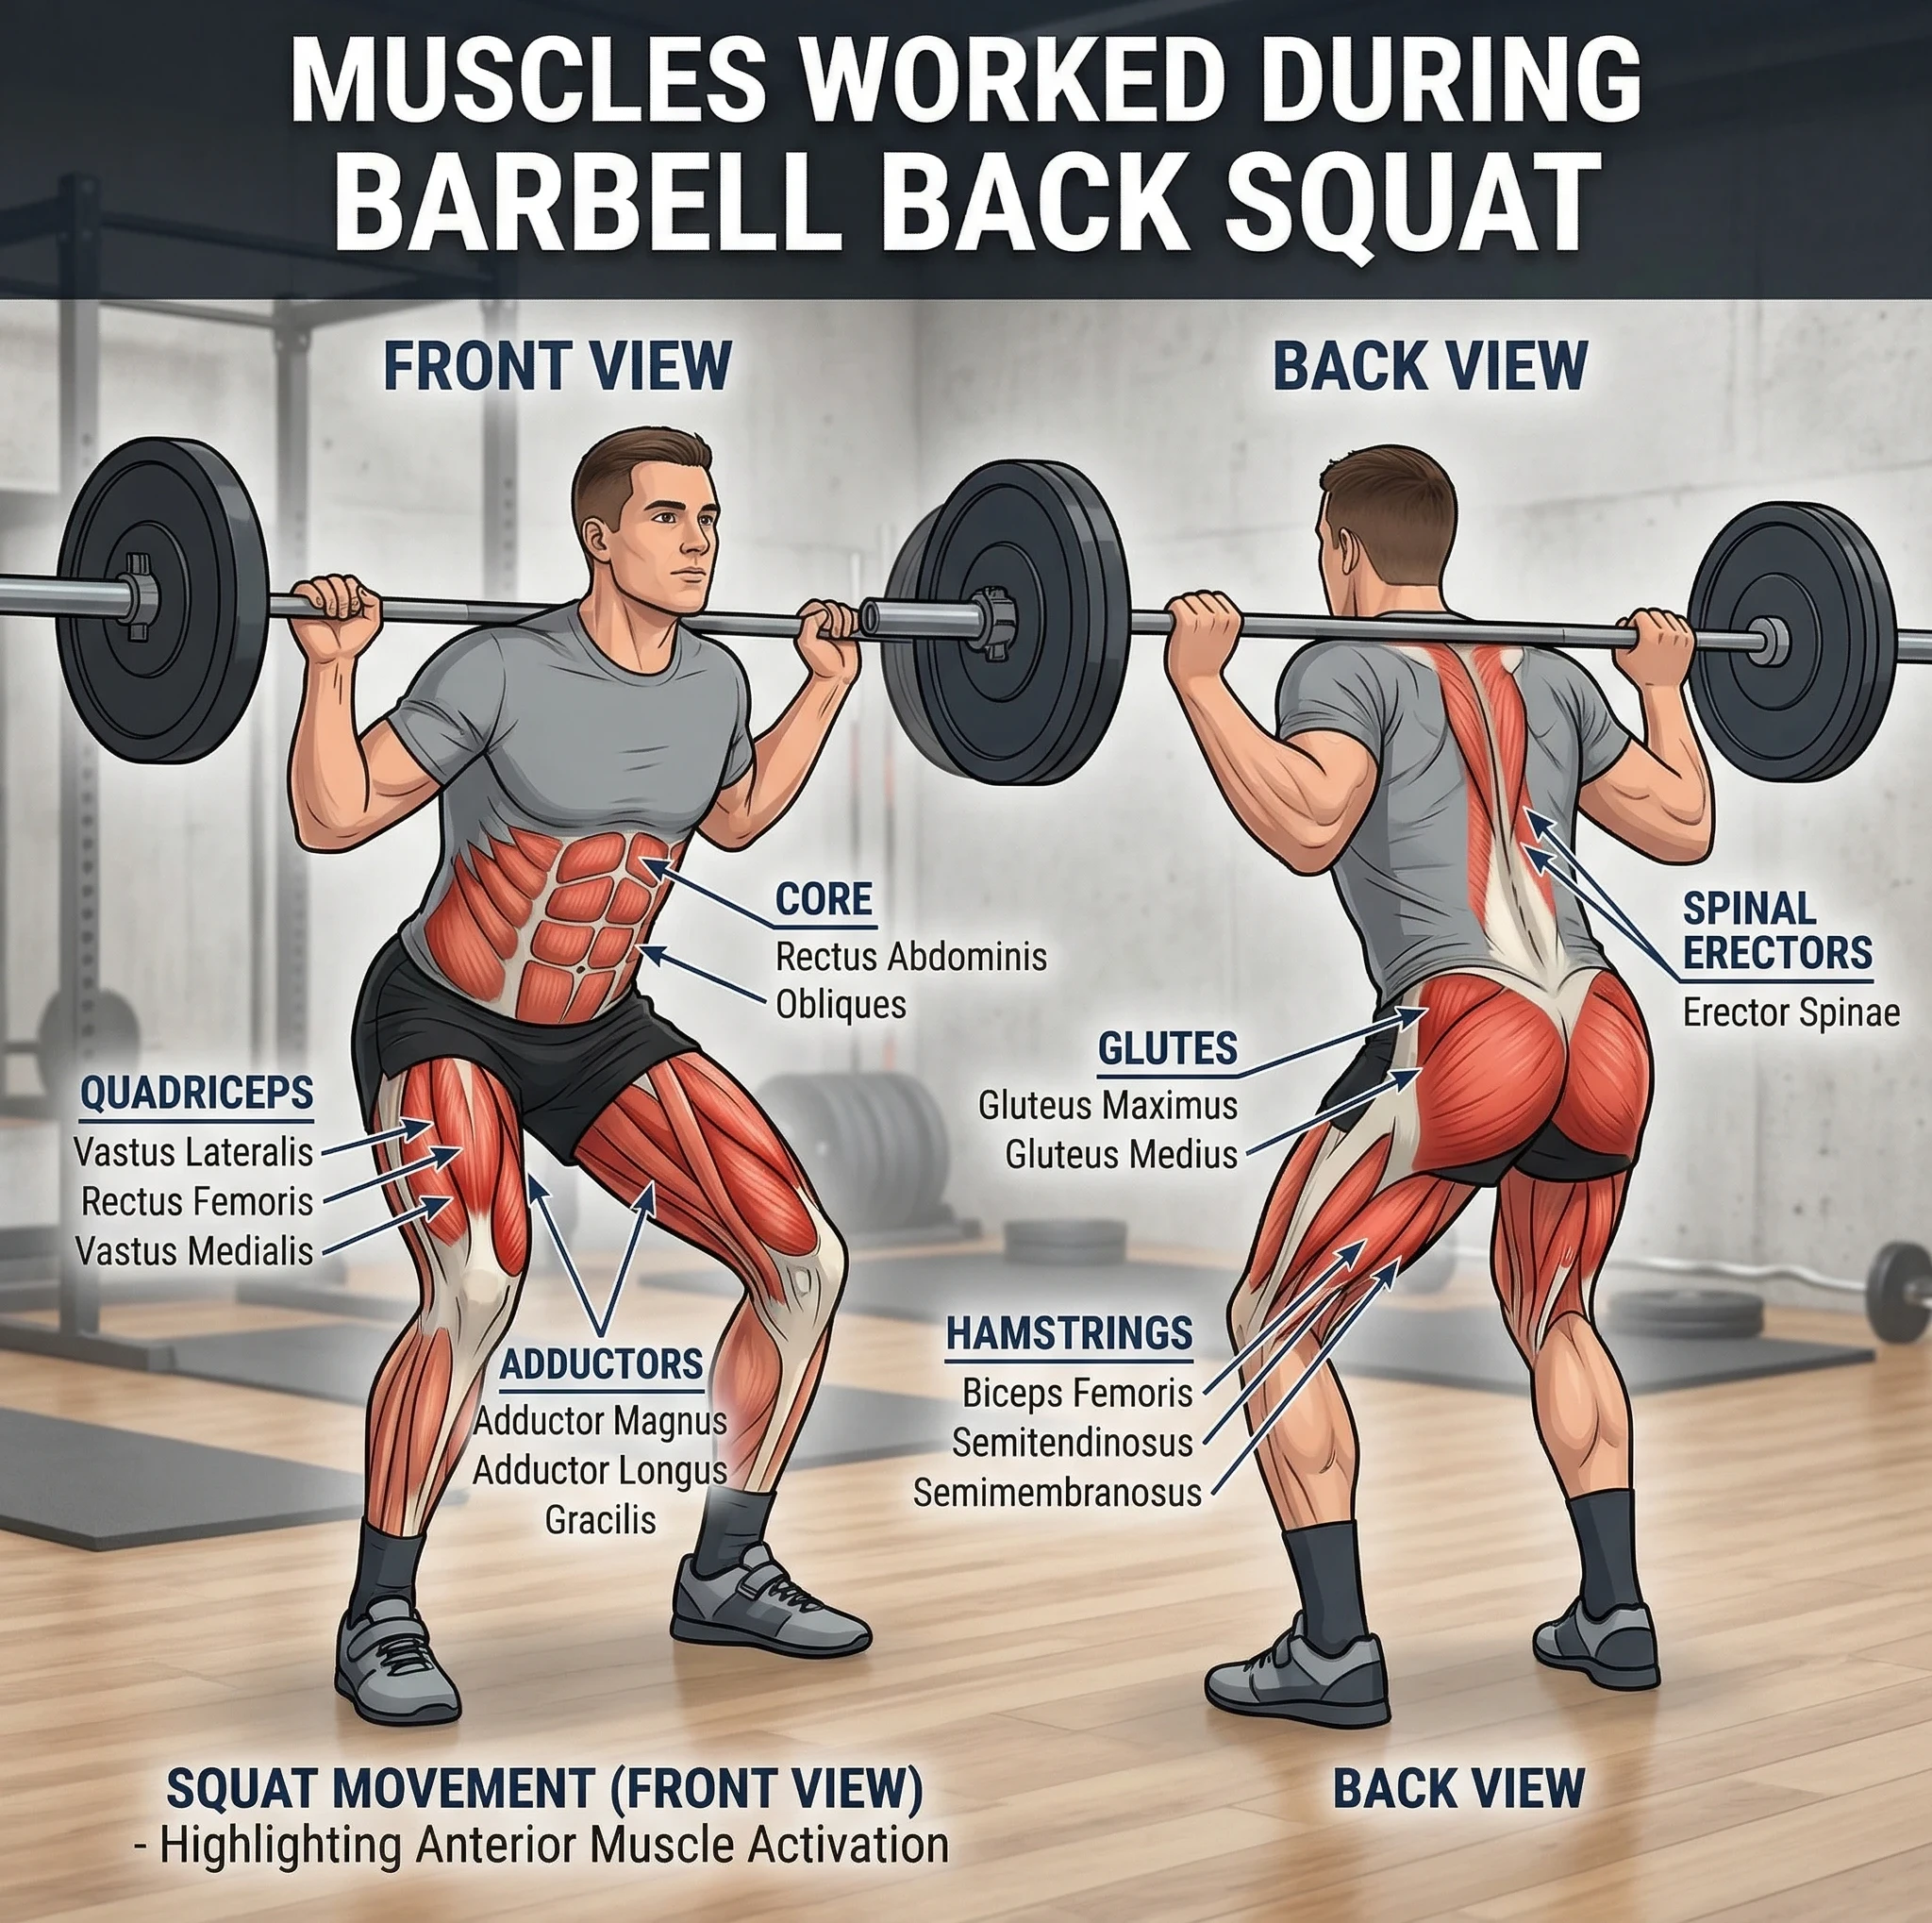
The squat targets and strengthens several major muscle groups—not just your legs:
- Quadriceps – The front of your thighs extend your knees every time you stand up
- Gluteus maximus (glutes) – These muscles do much of the work to drive your hips upward and support your stance
- Adductors – The inner thighs help stabilize and guide your hips through the motion
- Hamstrings – The back of your thighs support and help control the lower phase of the squat
- Spinal erectors – The muscles along your lower and mid back keep your back safe and upright
- Core (abdominals and obliques) – Help you stay upright and protect your spine during the movement
This all-in-one challenge is why the squat stands out for delivering strength and mobility when done carefully and with great form.
Safety Considerations for Beginners and Returners
If you’re brand new or coming back after some time off, safety and patience are key. Starting too heavy, using poor form, or skipping your warmup increases risk for strains or injuries. Here’s the approach I always recommend:
- Use just the bar (no added weights) until your technique feels solid
- Step up weight slowly; don’t rush
- Warm up hips, knees, ankles, and core before squatting
- Focus on smooth, steady movements instead of speed or ego lifting
- Ask someone to spot you or use squat safety bars, particularly if you feel uneasy
Sticking to these basics helps protect your knees, back, and overall confidence. These recommendations also align with widely accepted public health guidance on regular strength-building activity. If you feel pain (not just muscle effort), stop and check if you need to tweak your stance or range of motion.
Equipment Needed for the Barbell Squat
Starting out doesn’t require a complicated gym setup. Here’s your checklist for squatting safely and efficiently:
- Barbell: A standard Olympic barbell weighs about 45 lbs (20 kg).
- Squat or Power Rack: Lets you set the bar around shoulder height and squat safely. Modern racks come with safety bars to catch the bar if needed.
- Weight Plates: Add only when you’re confident in your form.
- Optional: Safety Bars or Spotter: For extra reassurance if you feel unsure about finishing a rep.
- Flatsoled Shoes or Barefoot: Solid footwear helps you balance and push hard. Avoid running shoes with thick padding or a high heel.
If you find the bar pressing on your upper back, you can use a barbell pad or foam pad for comfort. Just keep it thin so you don’t lose stability. When training in a shared gym space, following basic gym etiquette tips helps keep everyone safe and comfortable while using racks and equipment.
Proper Bar Placement: Highbar vs Lowbar Squats
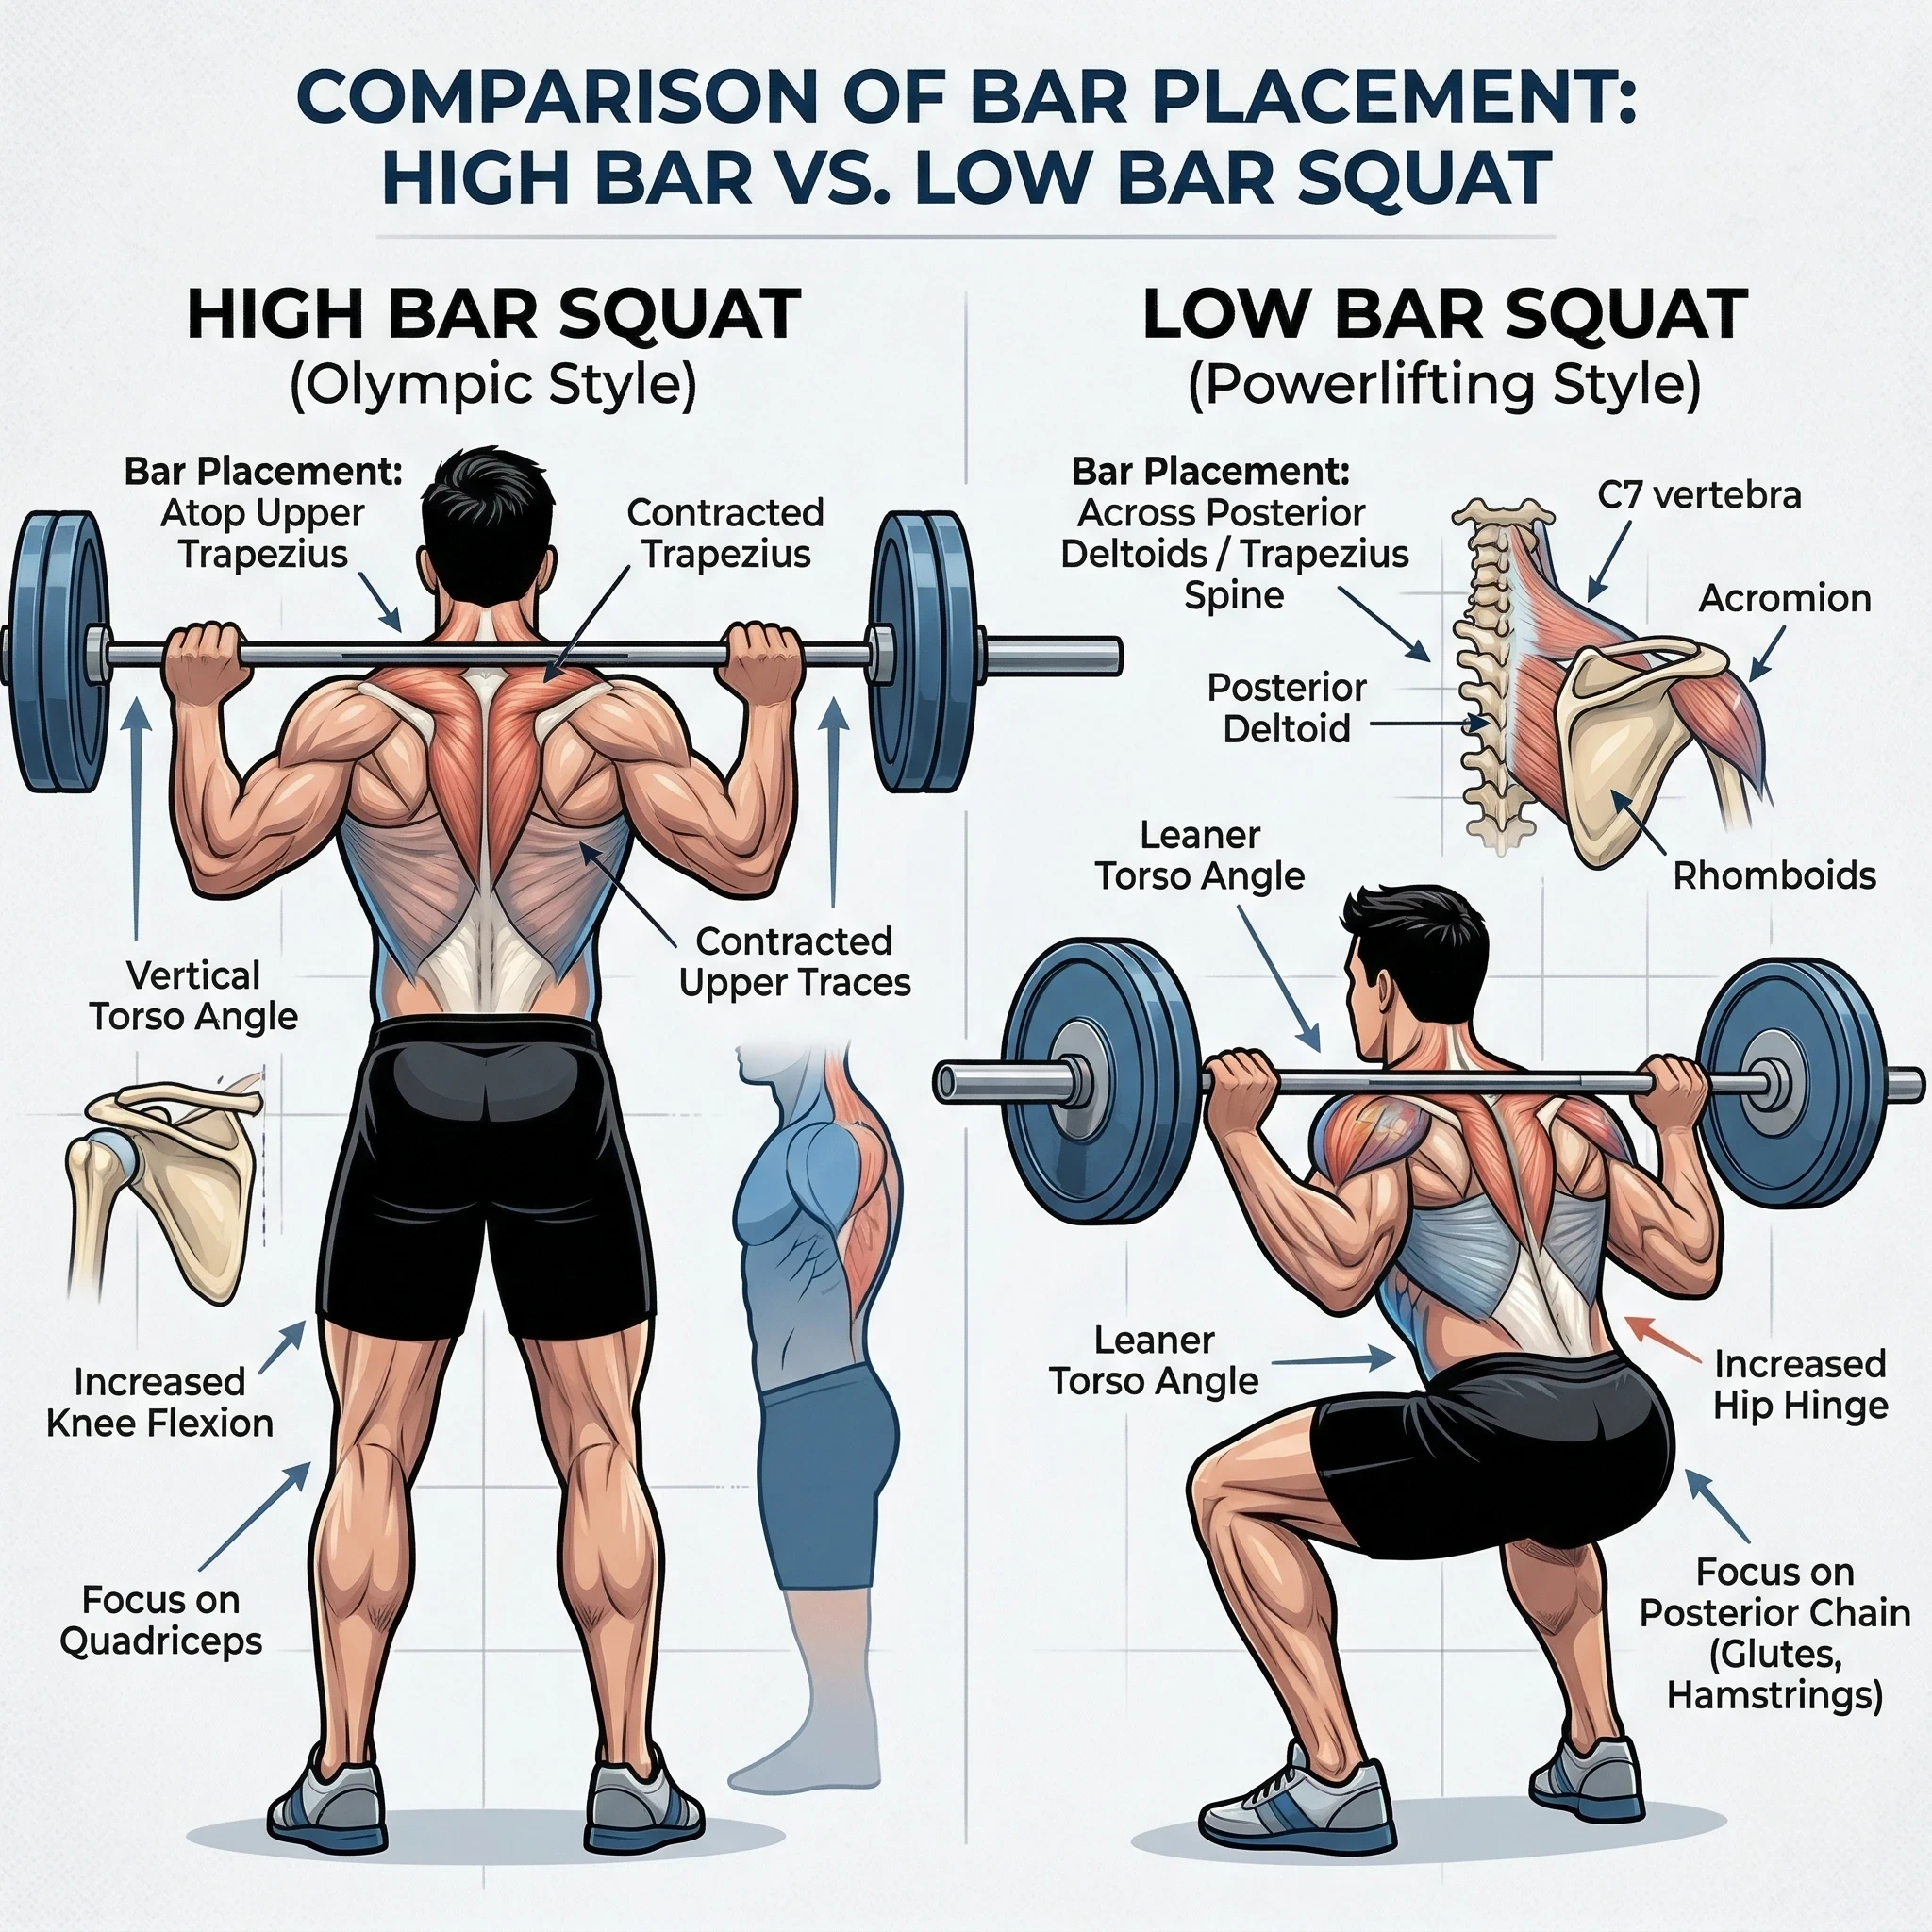
There are two common ways to set the bar: highbar and lowbar. Most beginners have a much easier time with highbar, since it puts less stress on the wrists and shoulders and tends to feel natural for most folks.
- Highbar Squat: Bar sits right on top of the trapezius muscles at your shoulders, just under your neck. This keeps your body upright and makes technique easier for starting out.
- Lowbar Squat: Bar rests a few inches lower, on the back of your shoulders over your rear deltoids. Many powerlifters use this style to lift heavier, but it asks for more shoulder mobility and a steeper torso angle.
For new lifters, go with the highbar placed across the upper back until the movement feels comfortable.
Step-by-Step Squat Setup
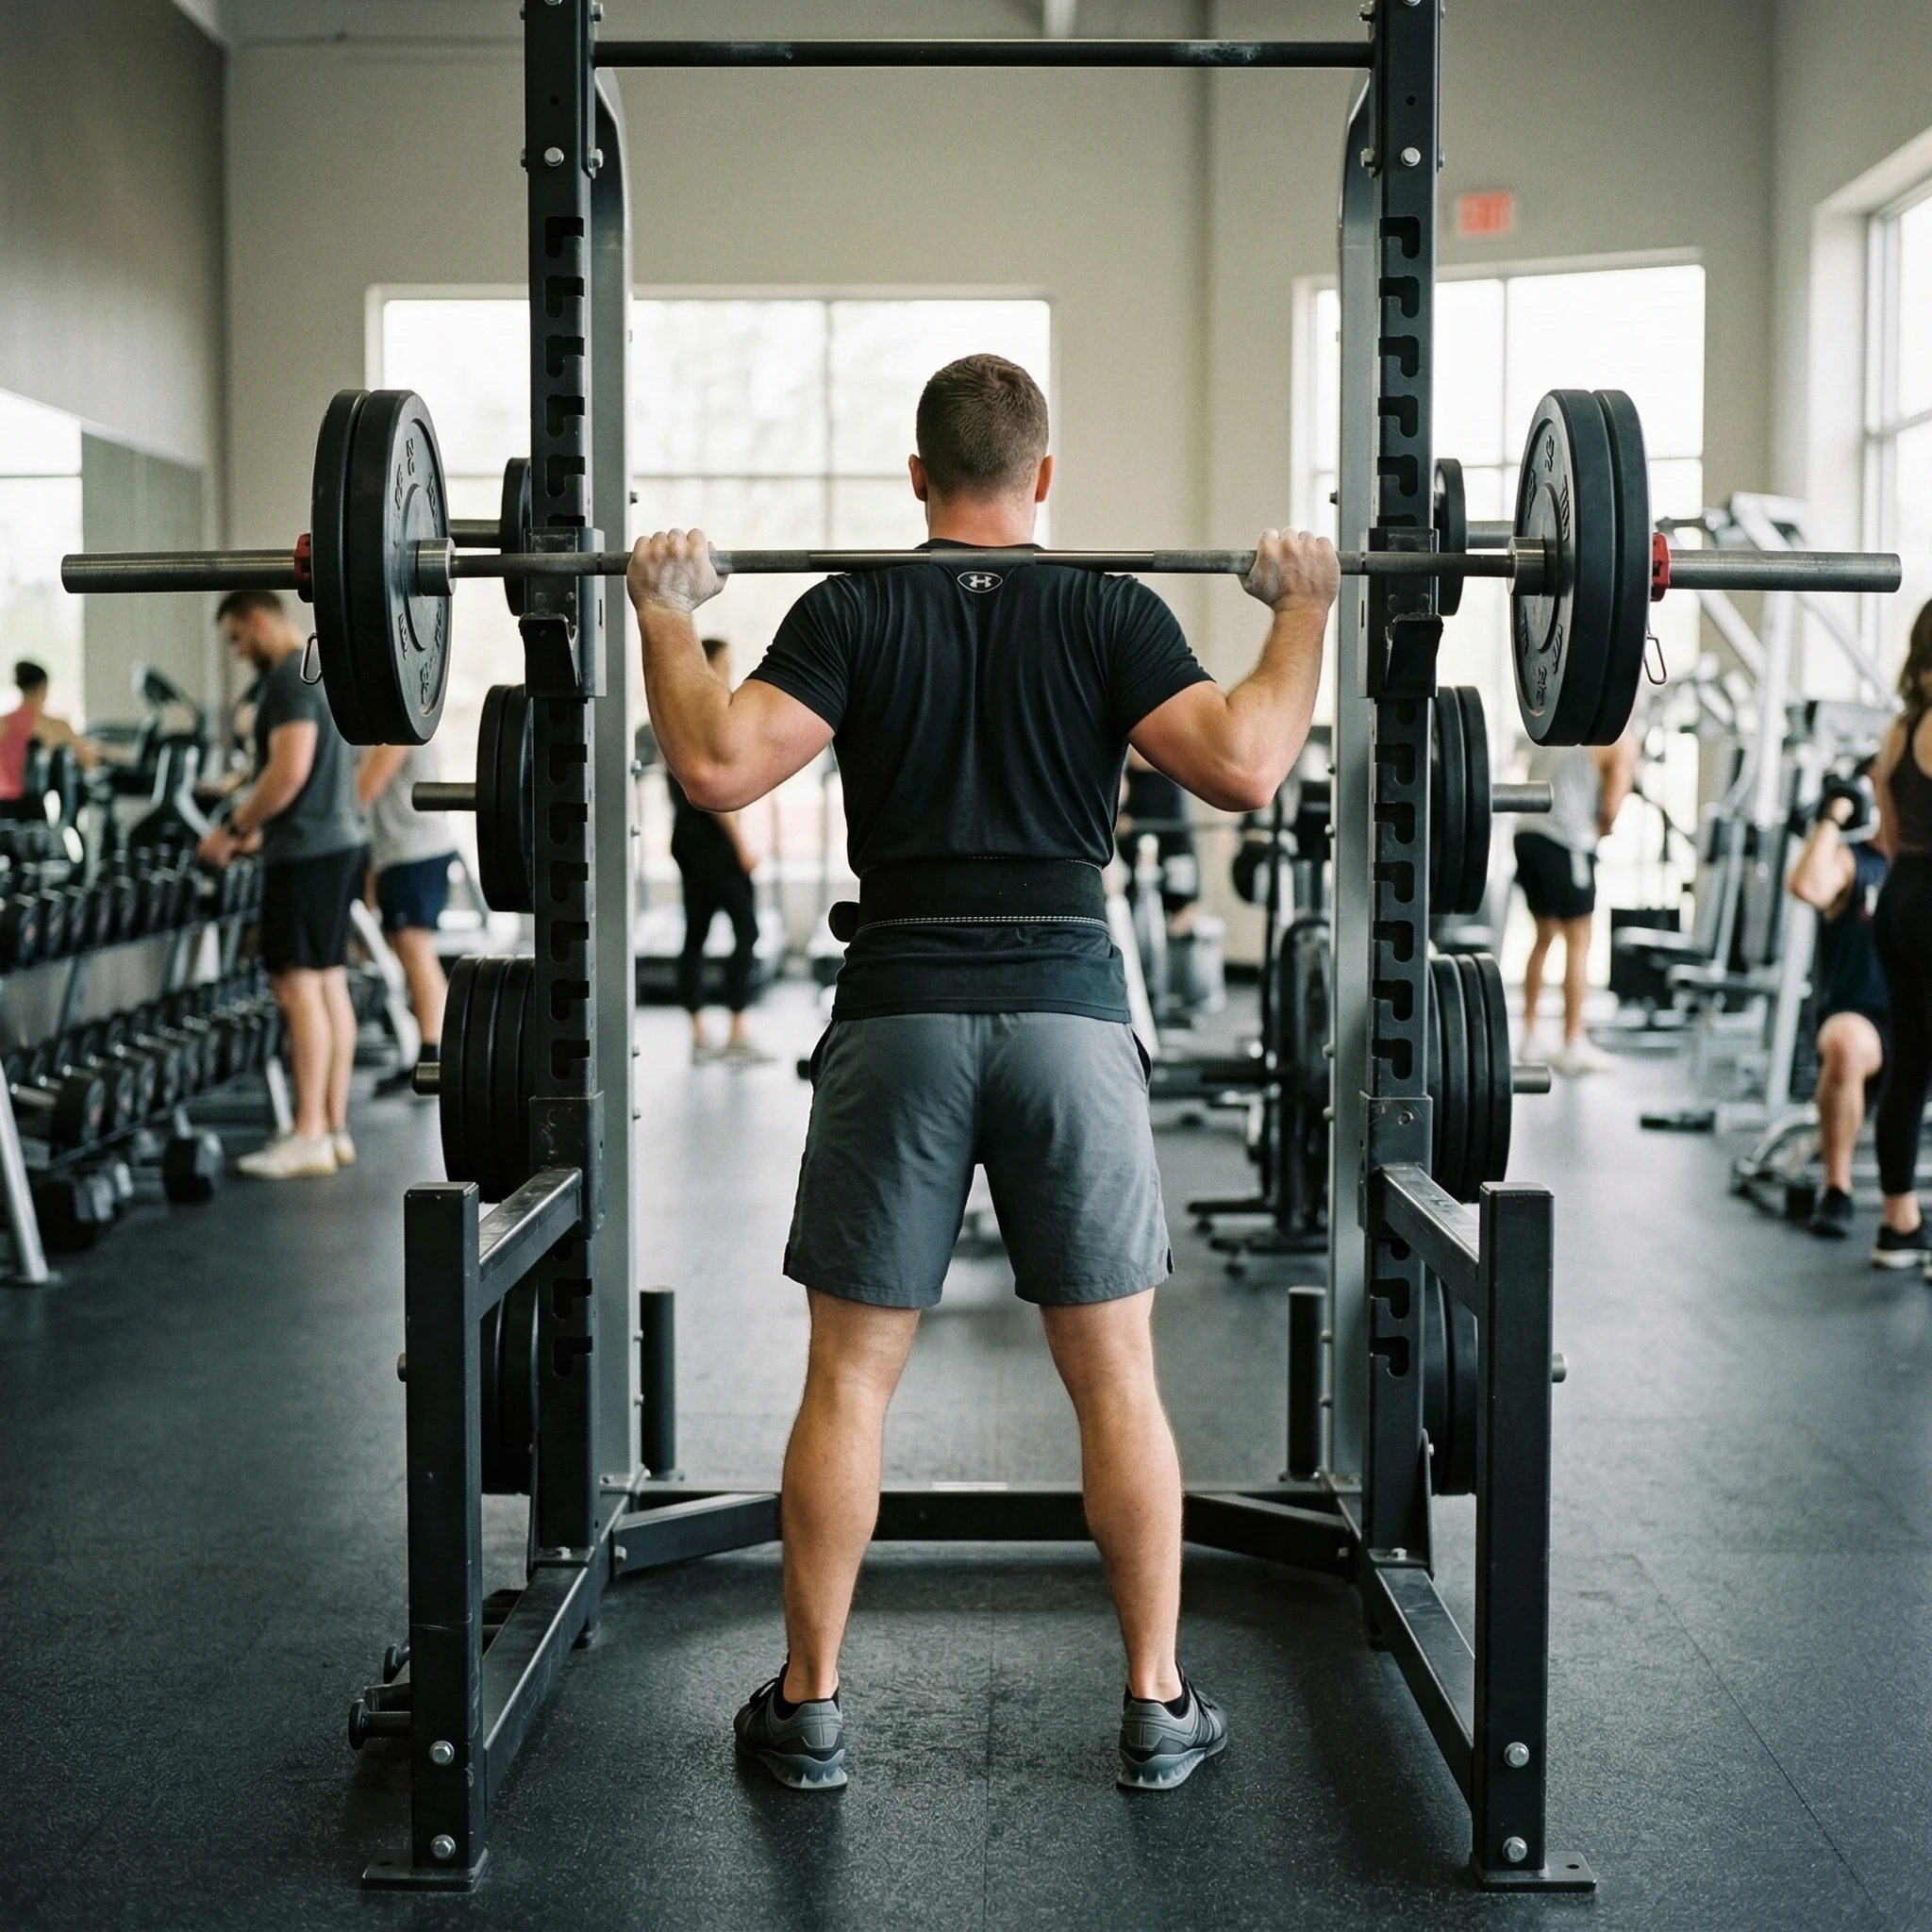
Set Rack Height
Place the barbell in your squat rack at just under shoulder height. This way, you can get under the bar without needing to go on tiptoes, but don’t have to squat too low just to unrack or re-rack. Add the empty bar to start.
Hand Placement and Grip Width
Face the bar and position your hands slightly wider than shoulder width on the bar. Grip from underneath, thumbs wrapping around. Tuck your hands in as close as is comfortable—this keeps your upper back tense and solid.
Position Under the Bar
Duck under and let the bar sit over your upper back muscles (not the neck). Squeeze your shoulder blades together, pulling elbows gently down and in to create a tight “shelf.”
Foot Position
Get your feet about shoulder width apart. Toes point out a little (around 10 to 20 degrees), matching your body’s natural movement. Stand up to lift the bar straight off the rack.
Bracing and Unracking
Take a breath into your belly, brace your midsection as if expecting a push, and stand up tall to unrack. Step back just a few tiny steps so you’re clear of the rack, then plant your feet evenly.
Final Stance
Confirm your feet are set and your weight is balanced over your entire foot—not just heels or toes. Staying centered helps with both safety and power.
Step-by-Step Squat Execution
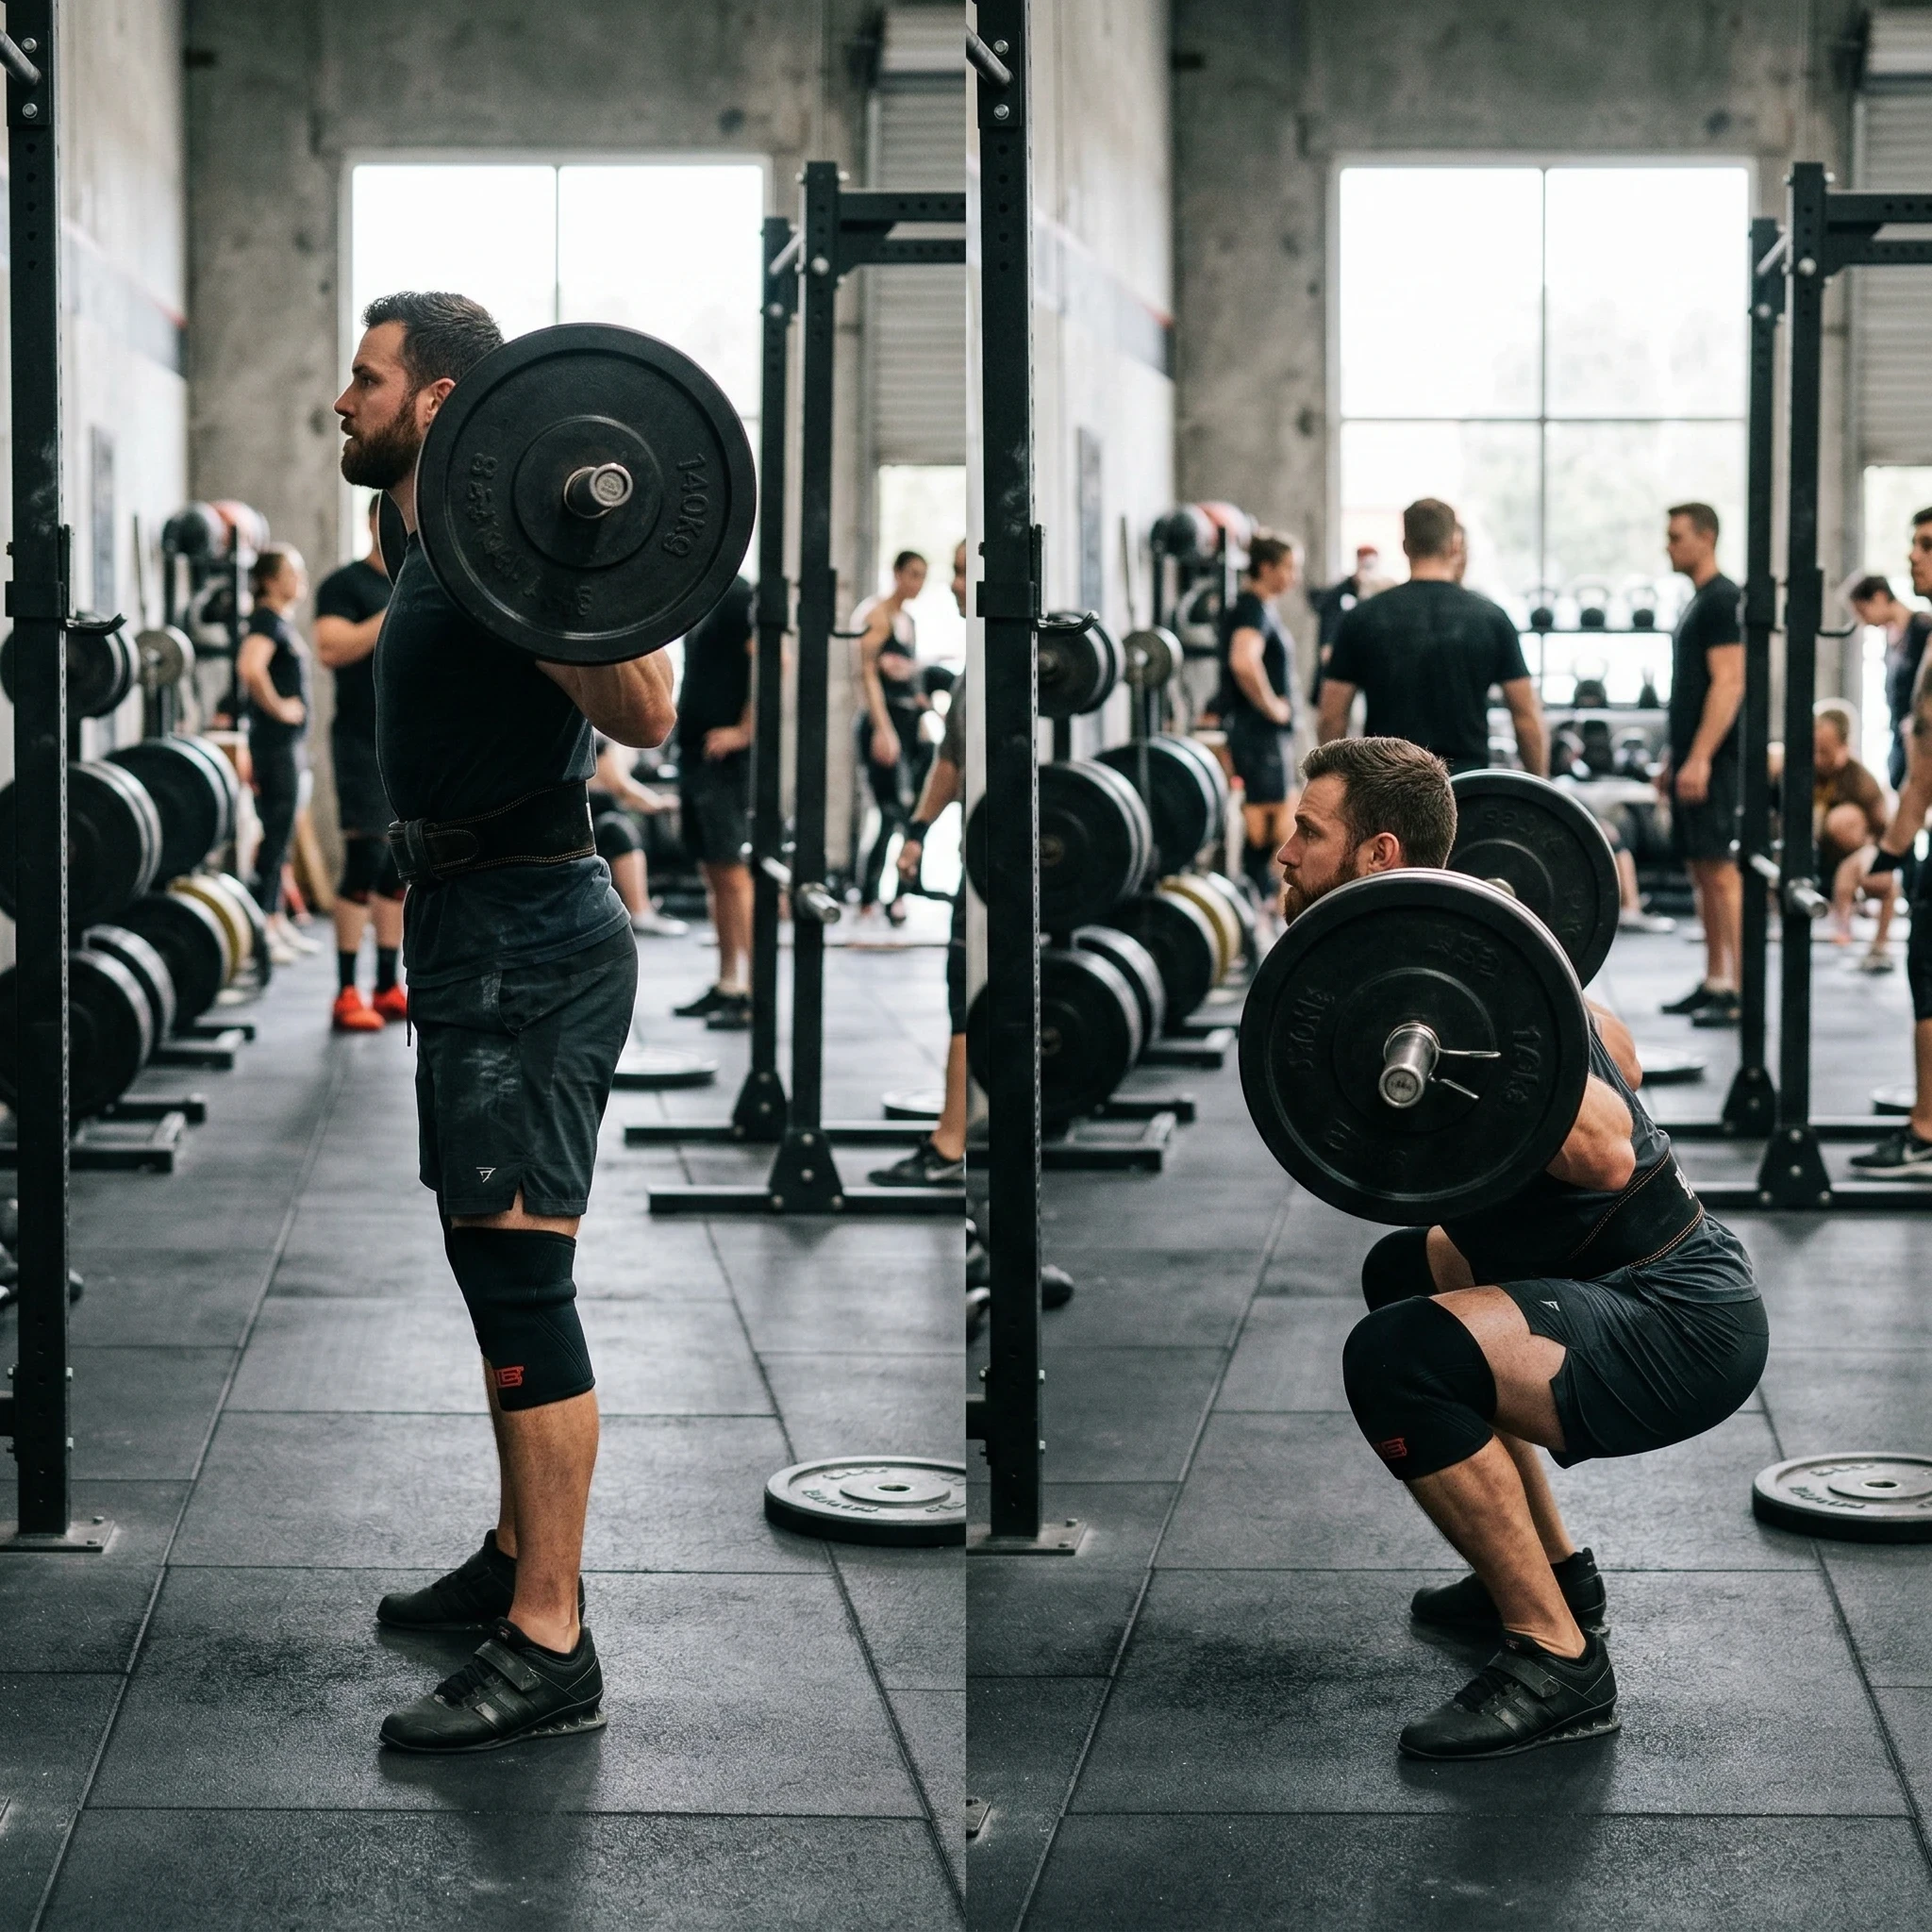
Controlled Descent
Kick off the squat by moving your hips backward and downward while bending your knees. Keep your chest held high, eyes ahead, and a strong, neutral spine.
- Lower yourself slowly and under control, almost as if sitting down between your heels
- Knees track out in line with toes—don’t let them cave in or flare way out
- Heels stay glued to the ground at all times
Depth
Sit down until your thighs hit at least parallel to the ground (your hip crease at or just below the top of your knee). Go deeper only if you can hold this form and stay pain-free. For most, just below parallel is the right goal if your body allows.
Ascent (Standing Back Up)
Push through your whole foot—imagine driving the floor away. Bring your hips and chest up at the same time; don’t let your hips shoot up by themselves. Stand tall and reset before your next rep.
Breathing and Bracing for Beginners
Breathing right helps you stay safe and strong. Here’s what works well:
- Inhale deeply into your belly just before you move
- Brace your core, as though you’re about to be nudged
- Hold that breath as you descend and rise; exhale at the top or just after the toughest part
Sticking to this technique sharpens your core and keeps your back feeling secure. Advanced lifters sometimes use “Valsalva,” but for most beginners, lighter, controlled breathing and bracing is both safer and effective.
Tempo and Movement Control
Control matters more than speed. Take 2–3 seconds to lower yourself, pause at the bottom (don’t bounce), and drive up with strong but steady effort. Skip quick, jerky, or bouncing motions—moving calmly keeps joints happy and form tight.
Squat Depth: How Low Should You Go?
Your depth depends on comfort, flexibility, and safety. Aim for your hip crease to reach just below the top of your knee—parallel. If you can’t get that low yet without compromising your form, stick to a range that lets you maintain heels down and a flat back. With time and practice, both strength and mobility will grow.
Common Beginner Mistakes (and How to Fix Them)
- Knees collapse inward: Actively push your knees out towards your pinky toes every rep. If you’re still struggling, lighten the weight or practice bodyweight squats in front of a mirror to check your knees.
- Heels coming off the floor: Your whole foot should stay solidly planted. Tight ankles can cause your heels to lift. Practice deep squats without weight to slowly build more ankle flexibility.
- Rounding the lower back (butt wink): Lock your chest up, brace your abs, and adjust depth to match what your back can handle. Deepen gradually as flexibility gets better.
- Leaning too far forward: Look ahead, keep elbows under the bar, and squeeze shoulder blades together tight. Try recording video or asking a friend to help you spot body position.
- Shallow squats (not hitting depth): Lower the weight and focus on getting to parallel with great form first.
How to Pick a Starting Weight and Progress
Start with bodyweight or just the empty bar (45 lbs/20 kg)—that’s enough for most beginners. If you want a fuller breakdown of beginner loading, read this guide on Beginner Weight Training Sets and Reps. Don’t feel pressure to pile on weight quickly; instead, zero in on form and smooth reps.
- After mastering 3 sets of 8–10 reps with control and no technique breakdowns, add about 5 lbs (2.5 kg) per side each session.
- If you feel pain or lose steadiness, end the set immediately and double-check your form.
Tacking on weight slowly is smart. It builds muscle, tendon, and joint durability while lowering risk. This gradual approach follows the principles of progressive overload for beginners, which is essential for safe long-term muscle growth.
Keys to Safe and Effective Squatting
- Warm up with light sets and mobility exercises before you squat heavy
- Set bar height right and use safety bars or a spotter if handy
- Brace core, keep your back flat all the way through
- Don’t rush; perfect reps matter more than chasing numbers
- Listen to your body—rest as much as needed for recovery
- Allow sufficient rest between sets so your muscles and nervous system can recover before the next attempt. If you’re unsure how long to wait, this guide on How To Structure Workout Rest Periods explains exactly how rest times influence strength, muscle growth, and workout performance.
Proper rest and recovery are just as important as technique, since muscles grow and adapt between sessions through adequate muscle recovery.
How to Practice Squat Technique Before Using a Barbell
You can create good habits and muscle memory before putting a heavy bar on your back. If you want a complete beginner-friendly home routine built around bodyweight exercises like squats, this Beginner Bodyweight Workout Plan To Build Muscle At Home shows how to structure full body training, progression, and recovery without needing gym equipment.
If you want a more structured weekly home workout schedule while practicing foundational exercises like squats, this 3 Day At Home Workout Routine For Beginners explains how to organize beginner-friendly full-body bodyweight workouts, recovery days, and progression across the week without needing gym equipment.
If you want the simplest possible starting point for practicing bodyweight movements before using gym equipment, this No Equipment Full Body Workout For Beginners At Home shows how beginners can build confidence with basic full-body exercises using only their bodyweight.
- Bodyweight Squat: Find your stance, brace, and go through motions slowly. Lock in balance and control.
- Goblet Squat: Hold a dumbbell or kettlebell at your chest and squat deeply. This style helps groove depth and torso position without a bar on the back.
- Tempo Squat: Take a slow 3-second descent, stay paused at the bottom, then stand up smoothly to teach your body control and patience.
Squat Alternatives for Beginners

If barbell squats still feel intimidating, mix in some alternatives for functional leg strength and confidence. Many of these movements are included in programs that emphasize the best beginner exercises for building strength safely before progressing to heavier barbell lifts:
- Goblet Squat: Best for form and strength basics before touching a barbell.
- Bodyweight Squat: Foundational for movement and mobility—anyone can start here.
- Leg Press: Puts less emphasis on balance or core; lets you focus on legs, especially if dealing with soreness or pain.
- Split Squat or Bulgarian Split Squat: Builds single leg power and stability, levels up balance, and enhances hip motion.
- Step-Ups: Great for single leg work and knee rehab, or for mixing up your routine without extra equipment.
- Machine Squat: Machines like Smith racks let you squat with more support while still building muscle. If free-weight squats still feel intimidating, this Guide To Gym Machines For Beginners explains beginner-friendly gym machines, proper machine setup, and simple machine exercises that can help you build confidence before progressing to more complex lifts.
Try any of these if you want to step up strength before moving on to the full barbell squat. Slow, controlled progress keeps you safe and feeling confident.
If you want to see how squats, leg presses, Romanian deadlifts, split squats, leg curls, and calf raises fit into one beginner-friendly lower-body routine, this Simple Leg Day Workout Plan shows how to structure leg training with clear sets, reps, warm-ups, rest periods, and progression.
Technique Checklist Summary
- Bar rests on upper back—not the neck
- Hands placed just wider than shoulders, upper back locked in
- Feet about shoulder width, toes aimed slightly out
- Brace the core, inhale and stay steady
- Hips move back and downward, knees out
- Thighs at least parallel, heels down, back stays flat
- Stand up smoothly on each rep; balanced over the midpoint of your foot
Common Beginner Questions
How deep should I squat?
Lower yourself as far as your flexibility allows while heels remain planted, knees point out, and back stays flat. Work towards parallel thighs or a little deeper—don’t force it. Progress comes as your mobility improves.
Are squats bad for my knees?
Squats are safe for most healthy knees—when performed with proper form and at a controlled pace. Those with existing knee issues should check with a trainer or doctor before squatting with weight.
How often should I squat?
Most beginners succeed with 1–3 squat sessions each week, with rest days in between for muscle recovery. For example, a 4 day workout routine for beginners often places squats inside a simple upper/lower structure that balances practice and recovery across the week. If you’re unsure whether full body or upper/lower training is the better structure for you, this guide on how to choose a workout split for beginners explains how to match your routine to your schedule and recovery. If you are considering a push, pull, legs structure later on, this Push Pull Legs Workout For Beginners guide explains why PPL is usually better after building a basic foundation first. The total number of sets you perform across the week also matters for progress and recovery (see this guide on Muscle Group Sets Per Week For Beginners). Regular practice beats excessive volume up front, especially when you understand the right sets and reps for muscle growth.
What if I’m sore the next day?
A little muscle soreness is normal when adding something new. If you feel sharp pain, joint swelling, or a twinge, rest, hydrate, and move gently till it settles down.
Do I need special shoes or gear?
Flatsoled shoes or barefoot are ideal. Avoid thick-cushioned running shoes, which make balance tough. Later you might try weightlifting shoes for added support, but for beginners, simple footwear works just fine.
Key Takeaways
- The barbell squat is a foundational compound exercise that builds full-body strength
- Beginners should start with light weight and focus on proper form before adding load
- Proper setup, bar placement, and bracing are essential for safety and performance
- Aim for controlled reps, steady tempo, and consistent depth (at least parallel)
- Avoid common mistakes like knees collapsing, heels lifting, or rounding the back
- Progress gradually using small weight increases once technique is consistent
- Practicing with bodyweight or goblet squats helps build confidence before using a barbell
Quick Squat Form Checklist (Save This)
- Bar on upper back (not neck)
- Feet shoulder-width apart
- Toes slightly pointed out
- Knees track over toes
- Chest up, back neutral
- Squat to at least parallel
- Push through full foot to stand
How To Squat For The First Time (Beginner Steps)
- Start with bodyweight squats
- Practice depth and balance
- Use goblet squats next
- Try empty barbell
- Add weight slowly
If Squats Feel Awkward or Hard
- It’s normal for beginners
- Balance improves with practice
- Start lighter than you think
- Focus on control, not weight
Final Thoughts
The barbell squat is one of the most valuable exercises you can learn as a beginner—but only when it’s done with proper technique and patience.
Taking the time to master setup, control, and movement quality will make every future workout safer, stronger, and more effective.
When you combine:
– Proper squat technique
– Structured training
– Progressive overload
– Adequate recovery
you create a foundation for long-term muscle growth and strength development.
Focus on consistency, move with control, and build confidence one rep at a time.
Beginner Bodybuilding Guides on Lift & Nurture
If you want to go beyond just learning the squat and start building a complete beginner muscle-building routine, these guides will help you apply proper technique within a structured plan:
• Beginner Bodybuilding Workout Plan (12-Week Foundation Blueprint) – A complete step-by-step program showing how exercises like the squat fit into a full muscle-building plan.
• 3 Day Workout Schedule for Beginners – A simple weekly structure that shows how often to train and how to organize your workouts.
• 4 Day Workout Routine For Beginners – A simple upper/lower split that shows how to organize squats and other foundational lifts across four weekly workouts.
• Push Pull Legs Workout For Beginners – Learn whether a push, pull, legs split is a good fit for beginners and when it may make sense after building a foundation.
• Beginner Bodybuilder Exercises – Learn which foundational movements (like squats, presses, and rows) you should prioritize as a beginner.
• How to Implement Progressive Overload for Beginners – Understand how to safely increase weight and reps over time once your squat technique is consistent.
• Beginner Weight Training Sets and Reps – Learn how many sets and reps to use so you can progress without overtraining.
• Muscle Group Sets Per Week For Beginners – Learn how many sets each muscle group needs per week and how to structure your total training volume for consistent muscle growth.
• How to Structure Workout Rest Periods – Understand how long to rest between sets for better performance and recovery during squats and other lifts.
• Muscle Recovery Tips for Beginners – Learn how sleep, rest days, and recovery habits support strength progression and reduce injury risk.
• How Much Protein Beginners Need to Build Muscle – Understand how nutrition supports muscle repair after exercises like squats.
• How Many Calories Should Beginners Eat to Build Muscle? – Learn how to fuel your body properly for strength and muscle growth.
• Muscle Building Nutrition Guide for Beginners – A complete breakdown of calories, macronutrients, and simple meal planning for muscle growth.
• Workout Mistakes Beginners Should Avoid – Avoid common errors that can affect squat technique, safety, and progress.
• How Long It Takes Beginners to Build Muscle – Set realistic expectations for strength and muscle progress as you improve your squat over time.
• Gym Etiquette Tips for Beginners – Learn how to safely and respectfully use squat racks and shared gym equipment.
References
Centers for Disease Control and Prevention (CDC). Physical Activity Basics and Your Health. Available at: https://www.cdc.gov/physical-activity-basics/about/index.html
Want a Complete Beginner Plan?
If you’re building a full beginner routine, start with a structured Beginner Bodybuilding Workout Plan (12-Week Foundation Blueprint) to combine proper exercise technique with smart progression across your entire body. If you want a simpler starting point, this full body workout plan for beginners shows how to organize squats, presses, rows, and accessory exercises into one beginner-friendly routine. If you want a simple upper/lower setup, a 4 day workout routine for beginners is another practical way to organize squats within a weekly training plan.
For the upper-body side of that structure, this Beginner Upper Body Workout At The Gym guide shows how to organize chest, back, shoulders, arms, and optional core work in a simple beginner-friendly session.
About the Author
Angel Carcamo is the founder of Lift & Nurture, a beginner bodybuilding platform focused on structured training, muscle growth fundamentals, and long-term progress.
As a beginner himself, Angel creates content based on evidence-backed principles commonly recommended in strength training, breaking them down into clear, simple steps for new lifters.
His guides focus on key fundamentals like progressive overload, recovery, and nutrition — helping beginners build muscle without confusion, shortcuts, or unrealistic expectations.
Start here: Beginner Bodybuilding Roadmap
Foundation guide: Beginner Bodybuilding Workout Plan (12-Week Foundation Blueprint)